ShopDreamUp AI ArtDreamUp
Deviation Actions


Description

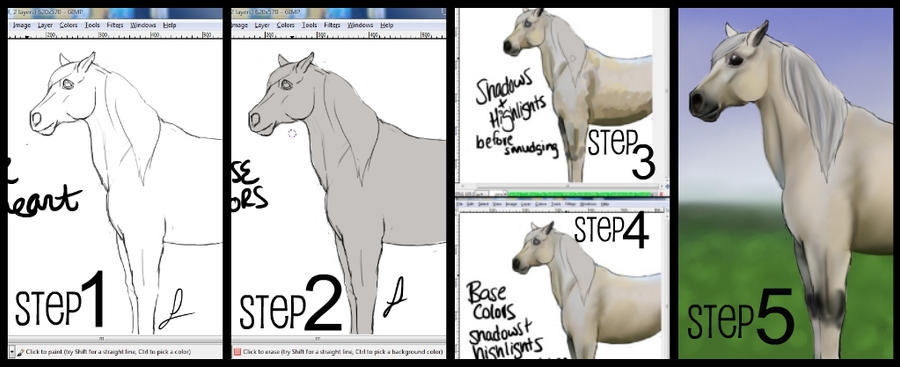
The Quick Equine Shading Tutorial
Created in Gimp Ver. 2.6.
Introduction:
This is my simple way of shading and drawing horses quickly digitally. It covers the basics as I'm not skilled enough to make a really detailed and thorough tutorial. It is key that you know the basics of Gimp to have this be of any help. Feel free to ask any questions about Gimp or on how I did this.
Step One: The Lines
Find a good reference photograph. Either from Bob Langrish or Google Images. Before you start drawing your horse first open up a new layer and name it Lines. This layer will be for your base lines. I've used the paintbrush tool using the circle fuzzy (15) brush on a scale of 16 to draw this horse. This is one of the standard brushes that comes with Gimp.
Step Two: Base Color
Once you are satisfied with your lines move on to the base color. Again open a new layer and name it Base Color. Move this layer underneath the Lines layer. This will make it so it won't cover up your lines. (You'll need to have the Layer Window open to do this.) I keep using the paintbrush tool but change my brush to the Circle brush. I colored the base gray color and erased anything that went over the lines. Base color done.
Step Three: Base Color-Shadows and Highlights
Here I create where the shadows and highlights are in the coat. I keep using the same paintbrush tool and brush. I scale it big or small which ever you need to cover what ever color, dark or light, is there. To get the colors correct I find another reference (or the same one if it has the coat color you want) and open it in Gimp. I then use the color picker tool to pick out the right colors. I paint them on until I've covered the horse in light and dark shades.
Step Four: Smudging Shadows and Highlights
This is a very simple step. I choose the Smudge Tool and change my brush to a circle fuzzy brush and keep it to a medium scale. I kept the smudge rate at 39.0 to insure that I don't smudge everything all together. Carefully blend the colors together.
Step Five: Shading, Mane, Background
First I created another layer naming it Color and keep it above all the other layers. I switch to the Airbrush Tool and keep the circle fuzzy brush and also use the color picker tool to receive correct shades. Once you're shading is done create another layer and name it Mane (and Tail if you have a tail also). Keep this layer above all the others. I switch to the paintbrush tool and either use the circle brush, the circle fuzzy brush, or both at different sizes. I choose different colors that I want the mane to be to give it texture. After I panted enough strokes I smudge them together still at the rate of 39.0. After this is done I create a background. I go to the last layer that by default is named Background and paint grass and a sky.
Art ©~pomhappymydog
Image size
1024x417px 197.55 KB
© 2011 - 2024 pomhappymydog
Comments46
Join the community to add your comment. Already a deviant? Log In
im going to use this on a coat im doing the shading is killing me")